When entering your authentication token within the EDQ Global Settings app, the following issues can be encountered and resolved by taking action in the Self Service Portal:
In the case of network issues, simply refresh the page and the validation will be attempted again.
For additional help please reach out to our customer support team.
When the application is updated from a previous version, we're not able to update the Page Layout used by the Custom Metadata Type as Salesforce don't allow this in managed packages. Therefore any new settings introduced in versions since the application was first installed must be manually added to the Page Layout. Settings that may be missing:
Follow these steps to add the missing setting:
When the application is updated from a previous version, we're not able to update the Page Layout used by the Custom Metadata Type as Salesforce don't allow this in managed packages. Therefore any new updates to setting tooltips in versions since the application was first installed must be manually updated in the Page Layout. Tooltips that may be incorrect:
Follow these steps to update the tooltip:
If the following two fields are missing from your EDQ State Setting Object:
Follow these steps to add them:
If you want to control whether Address, Email or Phone validation is enabled and whether the EDQ validation status is displayed against a field please refer to the Enable profiles page.
The default country setting should be applied with the following priority order when using inline edit mode:
This changes slightly when the New/Edit button has been overridden and the modal window is being used:
Inline editing is not available on non-EDQ Lightning components when the Edit action is overridden. This is an intentional Salesforce behavior and also happens with the standard Salesforce Record Detail component. One possible workaround is to remove the override for Edit only and rely on inline editing on the Lightning record page. Then, the Edit button should be removed from the page layout, as it will trigger the non-EDQ editing flow.
The app uses the Autocomplete search type of the Experian Address Validation API for real-time validation. Our Autocomplete search type is designed to provide accurate suggestions in real-time, that continually update as the user types. The user should provide the address elements in the order that they would appear on an envelope.
For passive validation in the background the app uses the Validate search type. This can be used with no user interaction required to return fully formatted addresses provided a verified match to a single deliverable address was made.
The number of suggestions is controlled by the Max Address Picklist Suggestions setting which is detailed on the Configure global settings page. The value is configurable from 1-25, with the default value being 7. Note that we do not recommend going above the default, as this may impact response speed.
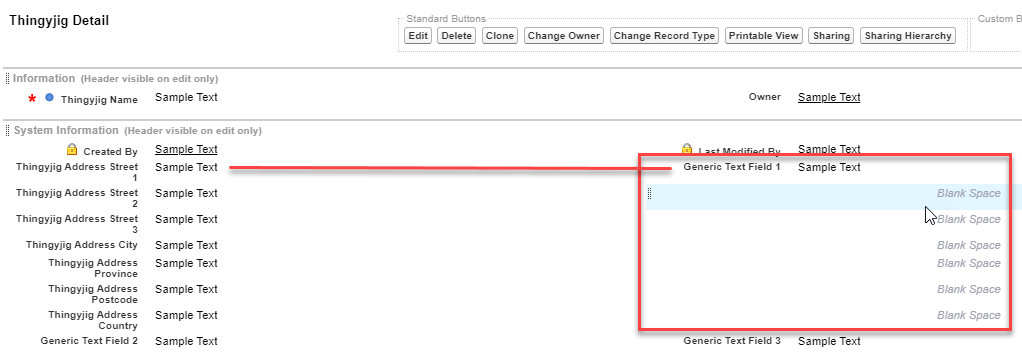
If your object contains a set of custom fields to represent an address, which are laid out across separate rows and have been configured as a Touchpoint, the fields are collapsed into a single address component in the layout which only consumes one row. This can lead to blank spaces below your address and to the right if you are using a two column page layout. A workaround for this is to stack all the fields that belong to the custom address on top of one another with blank spacer fields in the other column with the exception of the first trigger field for the address. The screenshot below demonstrates this:
If you are getting a component error, it is normally due to something going wrong in the set up of the app configuration (typically when creating the Named Credentials). Try the following things to rectify this error:
If an admin user validates an address/email/phone field which is later changed by a non-admin user you may find the new validation status isn't being saved. An error indicating INSUFFICIENT_ACCESS_OR_READONLY will be visible in the browser console and the EDQ Error Logs.
To resolve this, the Sharing Settings for Default Internal Access to EDQ Logs must be updated to Public Read/Write to allow non-admin users to edit a log record created by an admin user.
Server side errors can be found in the EDQ Error Logs item:
In addition, we also log some errors on the frontend, which can be viewed in your browser's Developer Console. Here's an example at the ERROR level:
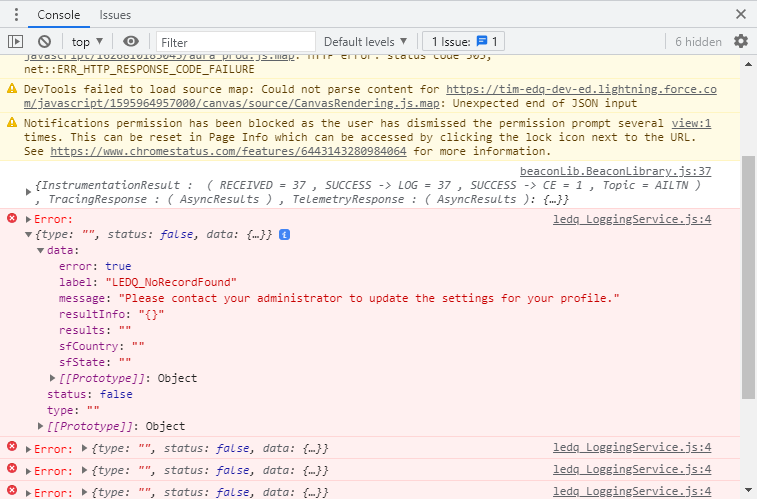
We also log at the INFO and WARN levels, such as in the case of unlicensed or missing Enrichment attributes.
Default frontend log level is ERROR
