The passive validation feature allows for Address, Email or Phone Validation to happen in the background for records created by Salesforce's Web-to-Lead/Web-to-Case functionality or for those created by other external sources, for example when using one of the Salesforce APIs. Validation is performed automatically when the record is created and does not require user interaction. You also have the option for validation to be performed every time an object is updated.
Current limitations
Configuration of passive validation consists of three parts:
First create a custom Trigger for each object that requires the passive validation functionality.
Go to Object Manager in Setup.
Select the Object you want to add the validation to, e.g. Lead.
Select Triggers.
Click New to create a new trigger.
Paste the following code into the Apex Trigger tab, adjusting the trigger name and object on the first line as required:
    trigger EDQ_Passive_Validation_Lead on Lead(after insert, after update) {
        TExperianLEDQ.LEDQ_WebToObjectService wtoSvc = new TExperianLEDQ.LEDQ_WebToObjectService();
        wtoSvc.tryRunPassiveValidation(Trigger.new);
    }
If you only want passive validation to run on record creation remove , after update from the first line.
Click Save.
Repeat these steps for other objects as required, remembering to update the object name on line #1 of the trigger.
Trigger on Lead object runs twice
Next, configure a Touchpoint for each address, email and/or phone field that needs to be validated. General configuration of Touchpoints is covered elsewhere in the Touchpoints section, but specific passive validation configuration for the different field types is detailed below.
Click on App Launcher. Type EDQ Global Settings in the Quick Find box, and select it.
Select Touchpoint Settings from the left-hand menu.
Click the New button found in the top right to create a new Touchpoint configuration for your Salesforce object or edit an existing Touchpoint.
Activate the Passive validation toggle.
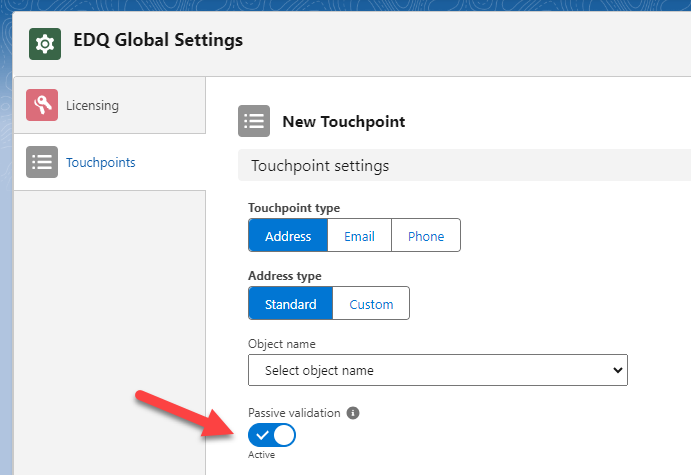
Configure any type specific configuration:
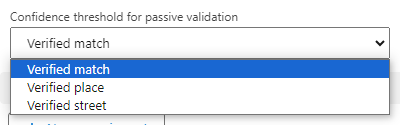
Select the desired confidence threshold for validation results where the input address is matched to a single deliverable address. You may wish to only accept fully verified matches or choose to accept a slightly lower match confidence where the street or building information is missing.
| Confidence threshold | Description |
|---|---|
| Verified match | The input was matched to a single deliverable address in our data. |
| Verified place | The input was matched to a single deliverable address in our data but the street information is missing. |
| Verified street | The input was matched to a single deliverable address in our data but the building information is missing. |
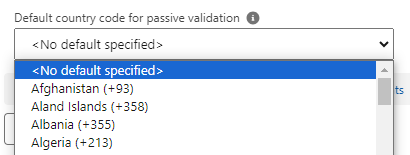
Select the default country code to be prepended to phone numbers when being validated. Use this option if you would to validate phone numbers for only one country. If no default is specified it is expected that the phone number will include the country code.
Finally, make sure an EDQ Profile Setting has been created for each profile that needs to perform passive validation, including guest users using Experience Cloud sites and profiles being used to create records via external sources using the Salesforce API.
