To enable the application to make requests to our validation APIs you must configure a valid authentication token.
Click on App Launcher. Type EDQ Global Settings in the Quick Find box, and select it.
Ensure the Licensing tab is selected and then choose from entering the Authentication Token you have received from Experian or requesting a free trial.
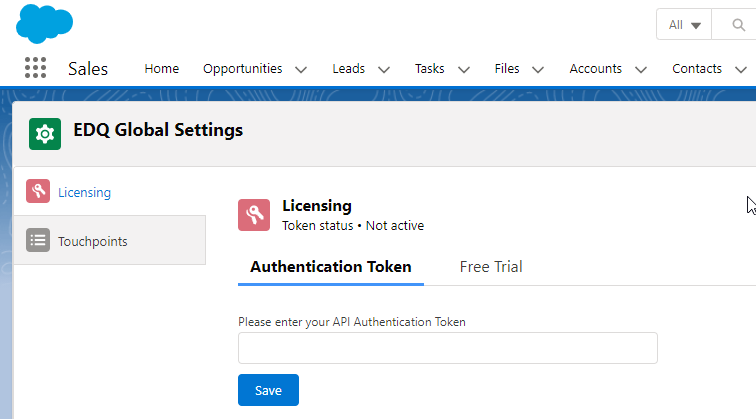
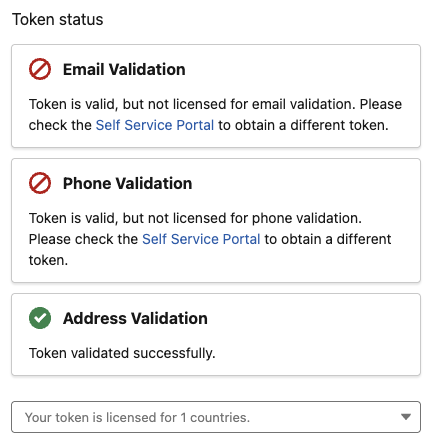
Once you save your token it will be validated and its current status will be displayed, helping you to confirm it is licensed for the expected products and, in the case of Address Validation, the expected countries/datasets. If you experience any unexpected errors when saving your token please refer to our troubleshooting guide.
Go to Setup.
Enter Custom Metadata Types in the Quick Find box.
Click Manage Records next to LEDQ Settings.
Click Edit next to Configuration.

The disabled fields come pre-configured in the package and can't be edited, but you can edit the fields referenced below as required and then click Save.
Controls what line endings are used for multi-line fields, allowing explicit configuration of CRLF (Windows) or LF (MacOS and Linux).
Determines whether country codes include the plus sign (+) when saved with the phone number.
If our EDQ components are used to validate a phone number or if the existing number in your database was entered manually with a plus sign (+), our component will display the plus sign (+) when your object is in view mode.
Default behavior
If you want to always retain the plus sign (+) when saving phone numbers, you must enable this config setting.
Determines whether the formatted phone number should be used rather than the default sanitized number.
Controls the format of the phone number if using the formatted phone number option. Possible values are E164, PLUS_E164, NATIONAL or any 3-letter ISO country code. If not specified, the default format, NATIONAL, will be used.
Determines whether supplementary live status is enabled for Phone Validation requests (which costs an additional 1 credit per successful request).
Controls where the country picklist appears in the EDQ address component, with options to appear above or below the other address fields.
Determines whether EDQ validation statuses will be displayed against address/email/phone fields even when EDQ validation has been disabled for the current profile.
If enabled, the country dropdown for addresses will ignore any default country settings and instead contain a "--Select a country--" option to mirror the behavior of Salesforce's State and Country/Territory Picklists functionality. If the user changes the country from "--Select a country--" to a particular country, but doesn't enter any other address details our component will save the address with just a country and an EDQ Log indicating the address has been manually updated.
When this setting is enabled an additional "Set default country" button appears to the right of the "Clear" button. This allows users to quickly clear the address and set the country to the default according to the documented logic.
Missing any settings?
