As of November 2020, Microsoft has changed some terminology. Please note:
| Legacy term | Current term |
|---|---|
| Entity, entities | Table, tables |
| Field, fields. Attribute, attributes | Column, columns |
| Record, records | Row, rows |
| Option set, multi select option sets, picklist, picklists | Choice, choices |
| Two Options | Yes/No |
Please view our installation and upgrade instructions.
If you have our older Microsoft Dynamics 365 v2 or v3 solutions, you must remove them first. If you have a previous version of our v4 solution, follow our upgrade instructions.
An Experian Account Manager will be in contact to create a license agreement with you or you can preview our terms and conditions. Alternatively contact Sales.
After installation you need to give read access to all relevant custom roles for the solution's web resources and entities.
Navigate to the Advanced settings page.
Click the arrow to the right of Settings in the main header and then click Customizations under the Customization sub-menu.
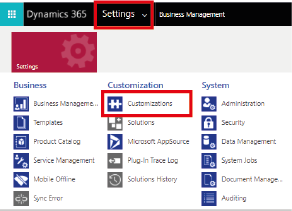
Click Customize the System.
Please view the documentation for our older v4.2 solution which details configuration using the Classic interface rather than Power Apps.
Our Microsoft Dynamics 365 PCF control supports all interfaces in Microsoft Dynamics 365 i.e. unified interface, quick create forms and main/standard forms.
Address Validation can be set on all forms containing one or more of the address fields (line1, line2, line3) or composite address.
The Forms section within each entity under Customizations will display any forms which are in use or available in your organization's Microsoft Dynamics 365 instance. Experian's solution can be activated on any of these forms.
Microsoft Dynamics 365 uses the Autocomplete search type of the Experian Address Validation API. Our Autocomplete search type is designed to provide accurate suggestions in real-time, that continually update as the user types. The user should provide the address elements in the order that they would appear on an envelope.
The solution will remember the last country you selected and show that the next time you go to add an address.
Yes. If the address you want does not appear in the dropdown, you can override the search and enter your own address. The Validation message will change to "Manual entry by user" and a new timestamp will appear.
Yes. Tracking and reporting is currently available in our client portal, based on the authentication token used.
You can view the response status codes mapping and the timestamp responses in our guides for address validation, email validation and phone validation.
Yes, address enrichment data, including geolocation data can now be enabled within the Microsoft Dynamics 365 integration, where you have this data included as part of your license.
There are several datasets available depending on whether you have just the address validation (autocomplete search type) service or the additional enrichment validation (which are purchased separately for each country).
Yes, multiple licenses are required. However, you can use a single authentication token, associated with all the licenses that you have purchased. Ensure that you have discussed these needs with your Account Manager.
This is done through the Configuration page within the Managed Solution you have installed. Within the Configuration page, you can input your token for Address Validation, Phone Validation and Email Validation. Enrichment is covered by the Address Validation token.
Yes. This is possible for validation tracking fields which are either Text or Date and Time format, not Option Sets. There may require some additional work from your organization's System Administrator for Microsoft Dynamics 365.
After validation of an address, email or phone number, a JavaScript error may occur.
TypeError: Cannot read properties of null (reading 'setValue').
This only occurs in version 4.0.131 of the app where validation results (message or timestamp) fields have not been mapped onto the form being used.
Create and add the Validation Message and Validation Timestamp fields to the form where the issue occurs. If you don't want to display these fields to your users, you can hide them form view.
