Upgrading
First install the solution and then assign the required security role as described below.
Check the prerequisites
There are two ways you can install the Experian Data Validation for Microsoft Dynamics 365 and Power Platform solution. Either from AppSource or by importing the solution file directly:
You should then be taken to your environment and see the Experian solution in the app list and its status.
This will install into the environment you have selected, but also at the tenant level. This means you then can activate the solution in other environments. To do this, view this Microsoft Power Platform guide.
Our Sales team will then be in touch to get you set up with licenses and provide you with authentication tokens. They will contact you via the details you entered while installing the solution.
To import the solution:
Select Advanced settings in the settings dropdown menu to the top right.
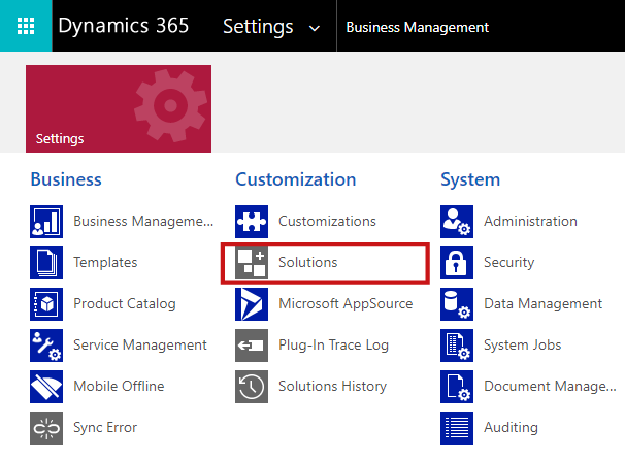
Click the arrow to the right of Settings in the main header and then click Solutions under the Customization sub-menu.
Click Import in the top bar of the All Solutions window.
Upgrade
Click Choose file in the Import Solution pop-up window and select the compressed solution file on your computer.
Click Open.
Click Next and then click Import to begin the import process.
Click Close once this is complete.
From v4.1 onwards the Experian solution has a built-in security role named ExperianDataValidationRole that should be assigned to users or teams (other than system administrators) that require access to the solution. The security role grants the following access:
| Custom table | Access level for user with security role |
|---|---|
| Address validation token | Read |
| Email validation token | Read |
| LookupMap | Read |
| Mapping | Read |
| OptionSetMap | Read |
| Phone validation setting | Read |
| TextMap | Read |
| Customization table | Access level for user with security role |
|---|---|
| Solution | Read |
If the user does not have the access levels shown above then the solution will fail with "insufficient permission" errors reported.
Follow the steps below to add the security role to a team (similar steps can be used to assign the role to a user):
If you are upgrading a previous version of our v4.x app, start by following the same steps as found under the Installing tab above then follow the post-upgrade step below. Note that if you are uploading the file directly, the only difference is that it will notify you: "This solution package contains an update for a solution that is already installed".
If you are upgrading from v4.0.163 delete the security role that was created manually in that version as the security role is now built into the solution. Follow the steps below to delete the v4.0.163 security role:
1. From the Classic view, go to Settings > Customizations > Customize the System.
1. Expand the Security Roles in the left panel and locate the role *ExperianDataValidationRole* and delete it.
1. If you are doing this after the import, there will be two security roles with the same name. In this case delete the one that is of State **Unmanaged** as shown below.

Visit the Products page of the Experian Data Validation Configuration Power App in order for any final upgrade actions to be initiated. If final upgrade actions are required they will be automatically initiated when you visit the page and upon successful completion you will see the notification "Data migrations successfully applied" displayed in the header of the page. If the message does not appear then no final upgrade actions were required. The solution is now ready to use.
