By combining the output variables of our EDQ Address Validation component with Salesforce's HTTP Callout action it is possible to configure a Screen Flow which allows users to validate an address and then enrich that address with additional data by calling out to our Experian Enrichment API to help you gain additional insight.
Additional licenses required
Enrichment API documentation
Before you configure an HTTP Callout action within Flow Builder, you must set up a named credential to authenticate calls to the external system, in this case our Experian Enrichment API. Salesforce's documentation for Using API Keys with Named Credentials covers all the general details, but we've provided instructions specific to our API below:
Go to Setup, then type in Named Credentials to the Quick Find box and select it.
First create an External Credential by navigating to that tab and clicking New on the right hand side.
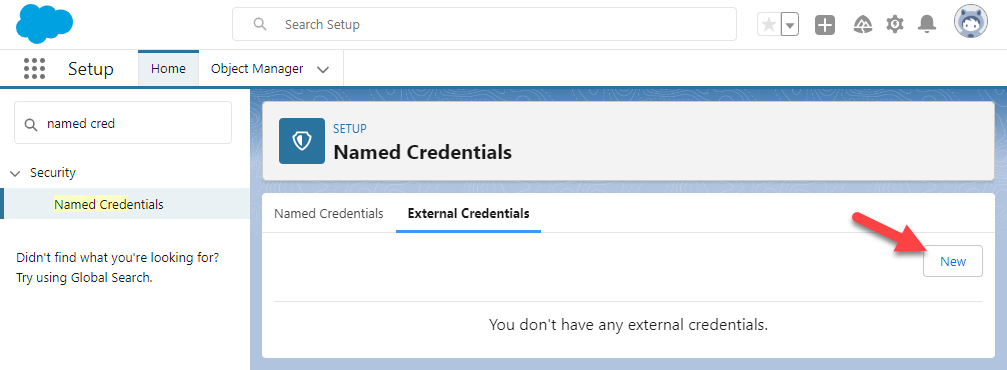
Fill in the following External Credential fields in the modal with these specifications:
| Field | Specification |
|---|---|
| Label | Experian Enrichment API Authentication |
| Name | Experian_Enrichment_API_Authentication |
| Authentication Protocol | Custom |
Click Save.
Scroll to Principals and click New to create a principal for this external credential with the following specifications:
| Field | Specification |
|---|---|
| Parameter Name | Experian Enrichment Principal |
| Sequence Number | Assign a sequence number. A sequence number specifies the order of principals to apply when a user participates in more than one principal. For example, a user could be part of multiple permission sets that are applicable for a credential provider. Priority is from lower to higher numbers. If unsure, just use 1. |
| Identity Type | Named Principal is the only preselected option. |
| Authentication Parameters | Add one with a Name of Token and Value of your Experian API authentication token. |
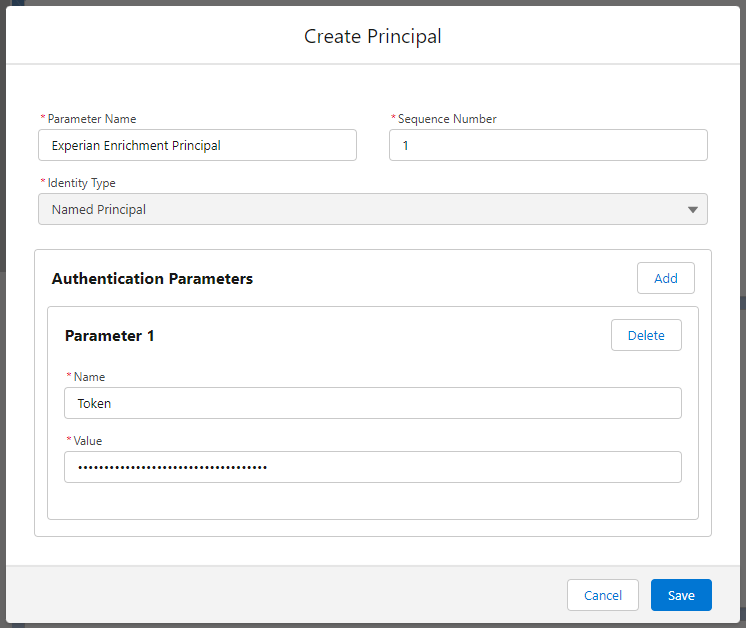
Click Save to save the principal.
Scroll to Custom Headers and click New to create a custom header for this external credential with the following specifications:
| Field | Specification |
|---|---|
| Name | Auth-Token |
| Value | {!$Credential.Experian_Enrichment_API_Authentication.Token} |
| Sequence Number | 1 |
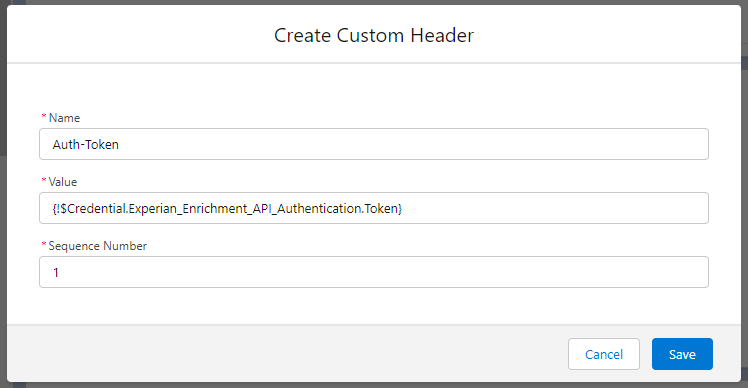
Click Save to save the custom header.
You can map a principal to multiple permission sets, permission set groups, or profiles. We detail the steps for the EDQ User External Credentials permission set created when you followed the steps earlier in this documentation on the assigning permissions page, but you may want to configure things differently based on your own org configuration. Further details can be found within the Salesforce Documentation.
Go to the Setup screen and type Permission Sets in the Quick Find box and select it.
Select the EDQ User External Credentials permission set.
Click External Credential Principal Access in the Apps section.
Click Edit.
Select Experian_Enrichment_API_Authentication - Experian Enrichment Principal in the left column and click the Add arrow to move it into the Enabled column.
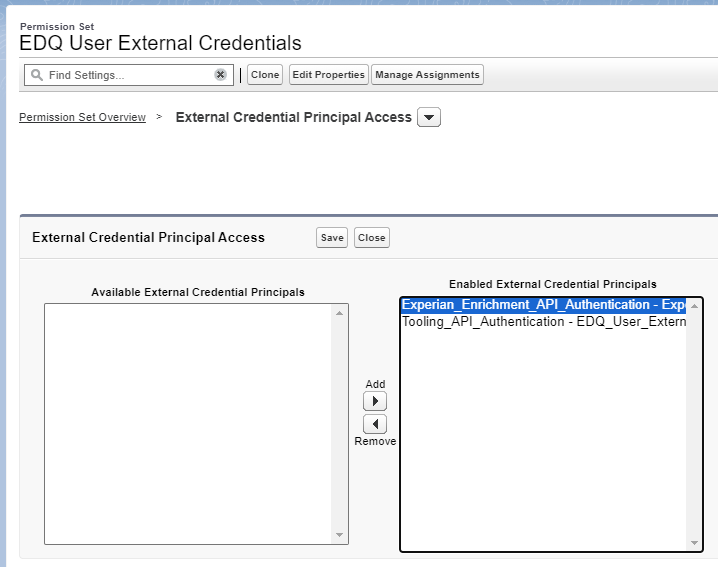
Click Save.
Click Manage Assignments and add an assignment for all users who will be interacting with your Screen Flow, both system administrators and standard users.
All users need External Credential Principal Access
Go to the Setup screen and type Named Credentials in the Quick Find box and select it.
Click New on the right hand side.
Fill in the following Named Credential fields in the modal with these specifications:
| Field | Specification |
| Basic | |
| Label | Experian Enrichment API |
| Name | Experian_Enrichment_API |
| URL | https://api.experianaperture.io/enrichment/v2 |
| Enabled for Callouts | Toggled on |
| Authentication | |
| External Credential | Select Experian Enrichment API Authentication |
| Callout Options | |
| Generate Authorization Header | Unchecked |
| Allow Formulas in HTTP Header | Checked |
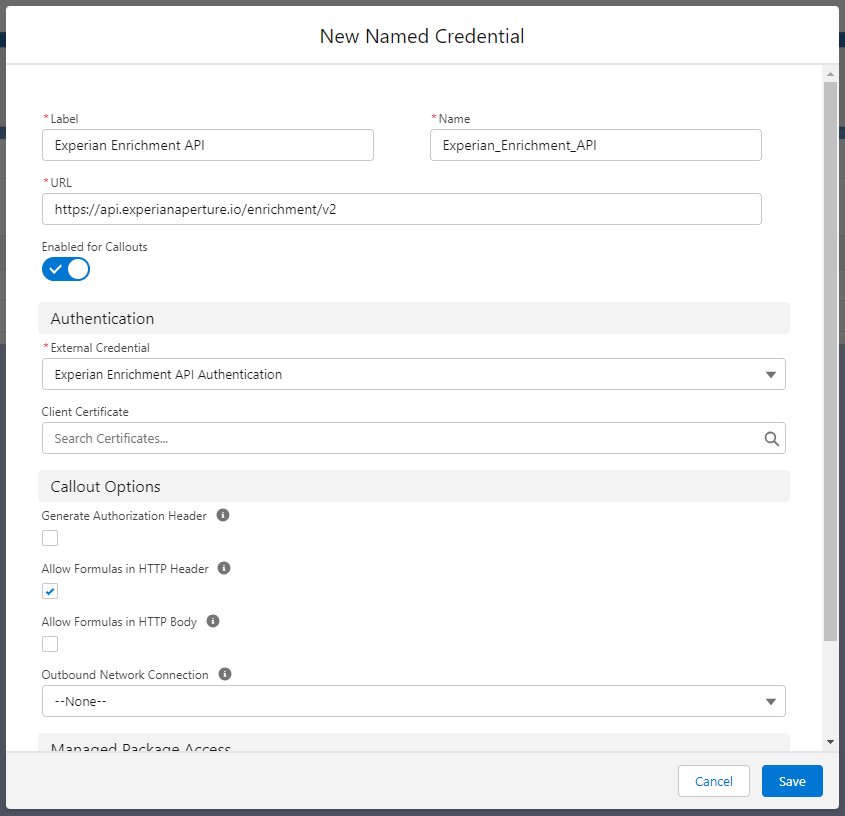
Click Save.
The Named Credentials subsystem stores secret tokens or values in the User External Credentials object. Using permission sets or profiles, you must grant the needed access (Read, Create, Edit, Delete) to the User External Credentials Object.
If you've used the EDQ User External Credentials permission set described in Step 2 above it will have previously been configured with the necessary permissions, but if you want to configure things differently based on your own org permissions configuration then further guidance can be found within the Salesforce Documentation.
Let's assume you already have a Screen Flow configured with a Screen element containing our EDQ Address Validation component, as per the earlier instructions in this documentation. The next step is to configure the HTTP Callout action which will POST to the Experian Enrichment API.
Click the + icon after the Screen element of your Flow containing the EDQ Address Validation component and add an Action element.
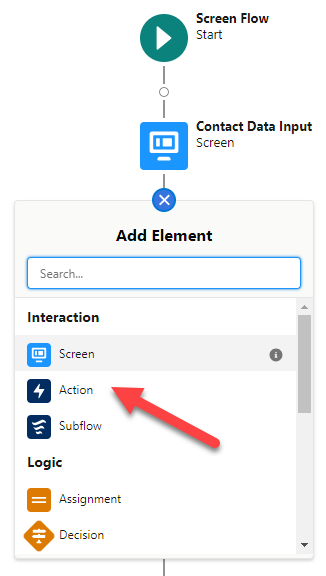
Click the Create HTTP Callout button at the very bottom of the panel on the right.
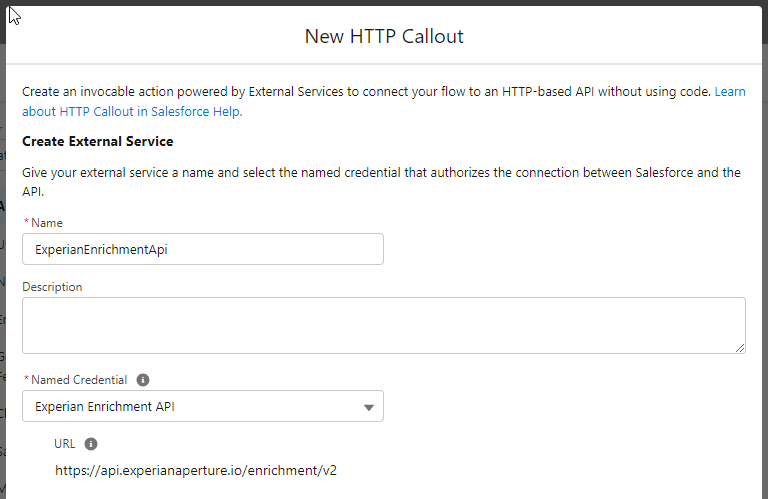
Enter a name of your choice, select the Named Credential you created in the steps above and click Next.
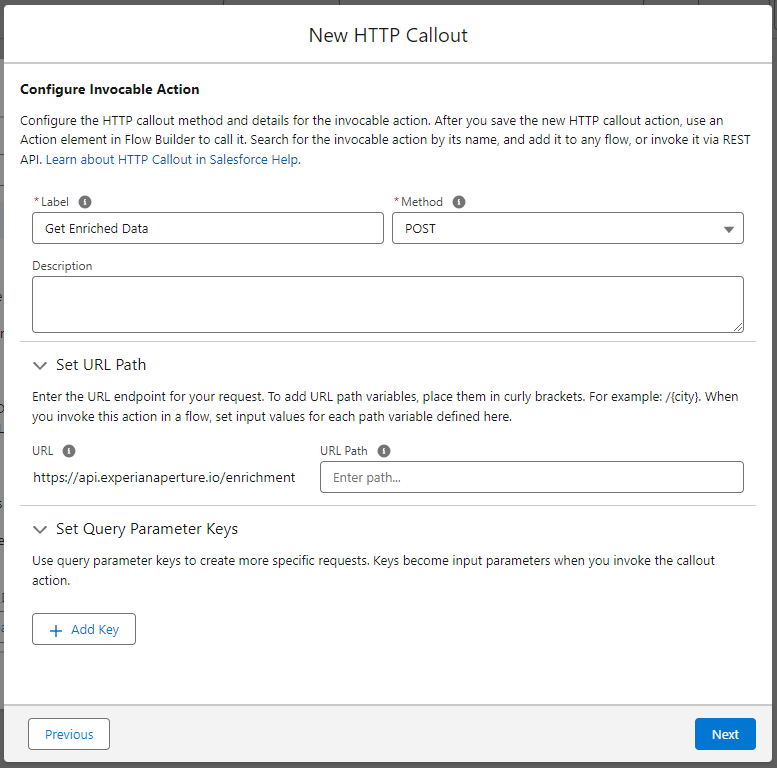
Enter a Label of Get Enriched Data and select POST as the Method. URL Path should be left blank.
Click Next and on the next screen paste a sample JSON request. These can be obtained from the API specification for the Experian Enrichment API. Below is an example for the Global Geocodes dataset:
{
    "country_iso": "USA",
    "keys": {
        "global_address_key": "aWQ9NDc1IEFudG9uIEJsdmQsIENvc3RhIE1lc2EgQ0EgOTI2MjYsIFVuaXRlZCBTdGF0ZXMgT2YgQW1lcmljYX5hbHRfa2V5PXw0NzUgQW50b24gQmx2ZHx8Q29zdGEgTWVzYSxDQSw5MjYyNi03MDM3fmRhdGFzZXQ9VVNBX1BBRn5mb3JtYXRpZD02YzJkN2RkNC05YzEzLTQ3YWUtYWZiYi0yZWMyYjEyNGE2NDVfVTQwXzI0XzBfMF8wPTQ3NX5xbD0yM35nZW89MA"
    },
    "attributes": {
        "geocodes": [
            "latitude",
            "longitude",
            "match_level"
        ]
    }
}
Click the Review button and then the Next button.
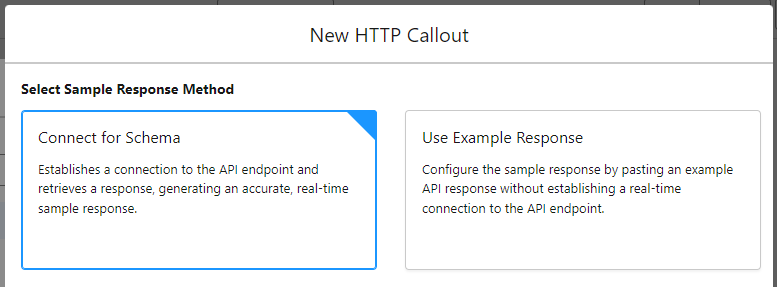
On the Select Sample Response Method screen select Connect for Schema and then click Next.
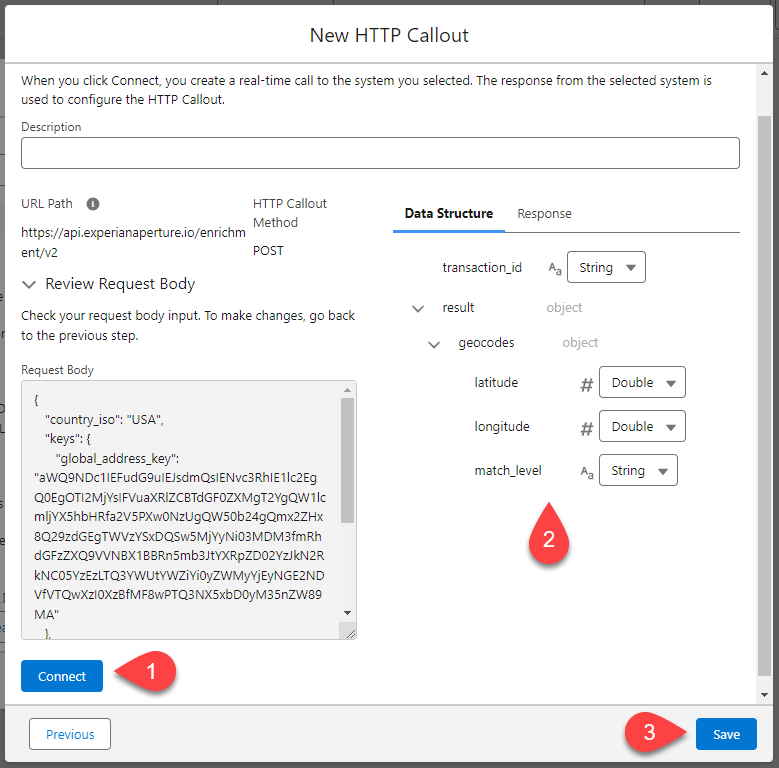
On the Connect with Sample Response screen scroll down and click the Connect button. Review the Data Structure and then click Save.
Flow Builder creates the action and external service and displays the edit action panel.
Give the new Action element a Label and the API Name will be populated automatically.
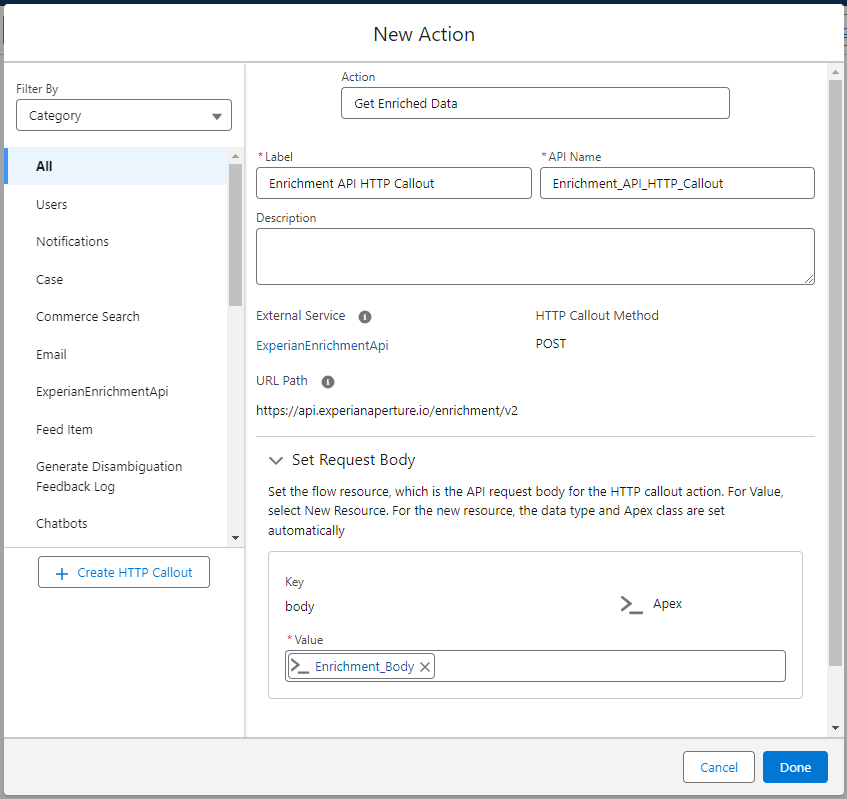
Under Set Request Body, click into the body value field and select + New Resource.
Enter an API name for the new resource, e.g. Enrichment_Request_Body. The other mandatory fields are automatically populated for you.
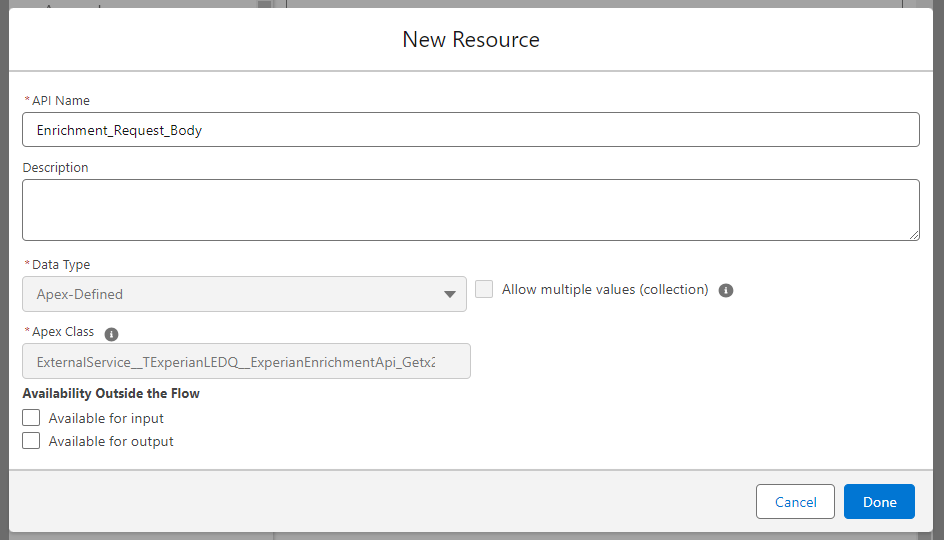
Click Done.
The body value is populated for you and you can click Save in the header to save the HTTP Callout action.
Having configured the HTTP Callout action with knowledge of the format of the request body, we now need to assign values to that request body from the output of the EDQ Address Validation component in the previous Screen element as well as specify which Enrichment attributes you want to request.
Click the + icon directly after the Screen element of your Flow containing the EDQ Address Validation component and before the HTTP Callout Action, and add an Assignment element.
The New Assignment panel will appear on the right of Flow Builder. Give the assignment a Label of Enrichment Request Body Assignment and the API Name will be populated automatically.
Set the variable values. There are two required variables and beyond that the variables needed will depend on the Enrichment dataset attributes required. In the case of Global Geocodes you could include latitude, longitude and match_level.
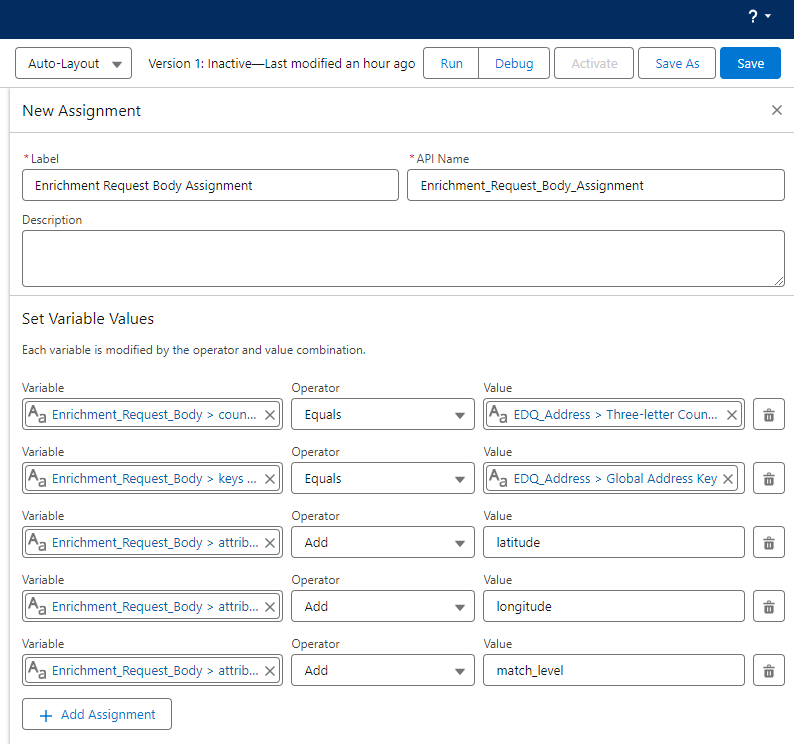
Set the first variable to be the ISO Country Code of the request which comes from the validated address. Under APEX-DEFINED VARIABLES select Enrichment_Request_Body > countryx5fiso. Leave Operator as Equals. For Value, under SCREEN COMPONENTS select EDQ_Address > countryCode3. Note that the screen component may be different depending on the API name for the component in your specific flow.
Click + Add Assignment and set the second variable to be the Global Address Key. Under APEX-DEFINED VARIABLES select Enrichment_Request_Body > keys > globalx5faddressx5fkey. Leave Operator as Equals. For Value, under SCREEN COMPONENTS select EDQ_Address > globalAddressKey.
Click + Add Assignment and set the third variable to be the first attribute you want to request from the Enrichment API. If we continue the example here for Global Geocodes, this could be the latitude. Under APEX-DEFINED VARIABLES select Enrichment_Request_Body > attributes > geocodes. Set Operator to Add as we're constructing an array. For Value, latitude.
Repeat the previous step as required for the attributes you need.
Click Save in the top right and close the New Assignment panel.
This is very much an optional step, but is included to allow you to test the process by displaying the results that come back in the response from the Enrichment API.
Click the + icon after the Action element of your Flow that performs the HTTP Callout and add a Screen element.
Add Text components to the screen for each response attribute you want to see and set their Default Value to the Outputs of HTTP Callout, e.g. {!Enrichment_API_HTTP_Callout.2XX.result.geocodes.latitude}.
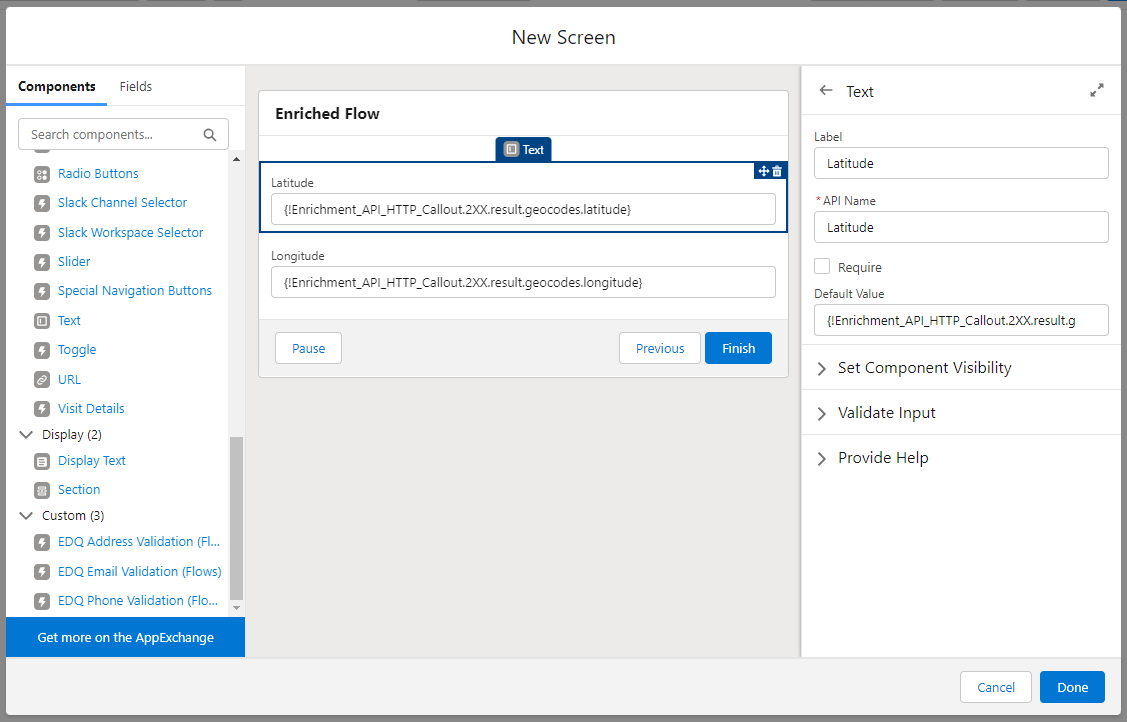
Click Done.
Debug your flow and test it works as expected.