It is possible to override or translate all the application's labels and messages using the Salesforce Custom Labels feature.
Are you using State and Country/Territory Picklists?
This customization only works when Salesforce State and Country/Territory Picklists are disabled. If you were to enable picklists, your customizations would no longer appear and you will have to follow these steps: State and Country/Territory Picklists configuration. Your customization will be saved and be reinstated if you were to switch picklists off again.
Enable Translation Workbench
First you must enable the Translation Workbench for at least one language:
- Go to the Setup screen and type Translation Workbench in the Quick Find box and select Translation Language Settings.
- Click the Enable button to turn the workbench on.
- Then add the language(s) required, including English if you just want to customize rather than translate.
With the workbench enabled you can now edit the Custom Labels.
Edit Custom Labels
- Go to the Setup screen and type Custom Labels in the Quick Find box and select it.
- Click any of the labels prefixed with LEDQ, not the Edit button next to them.
- In the Local Translations / Overrides section at the bottom of the page, click the New Local Translations / Overrides button.
Section not visible?
If this section is not visible, check you have Translations enabled (in the Translation Workbench).
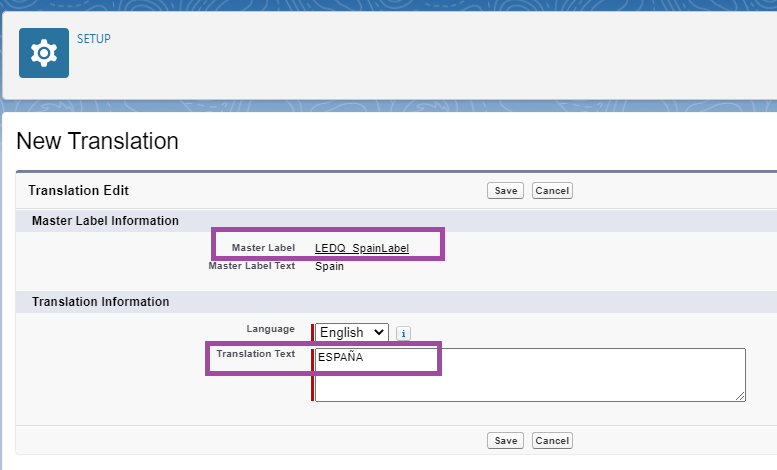
- Under Translation Information select your chosen language, enter the required Translation Text and click Save.
Delay in updates appearing
Although the updates are automatic, it can take a while for the custom label(s) to appear on your forms.
The below example illustrates changing the displayed name for Spain:

You now need to use the value used above, "ESPAÑA", in the Integration Value field for Spain in LEDQ Countries (under Custom Metadata Types). This Spain example is continued here: Country Custom Metadata Type and illustrates where this would need to be added.
