This page is intended for anyone wishing to make a quick start using Experian Pandora to analyse their data. This is only a quick introduction to the functionality available - the process discussed here should be just enough to get you started.
Comprehensive documentation is located alongside the Experian Pandora program files once you've installed your product.
 1. Bring in your source data
Make your data available in Experian Pandora either by uploading a file or connecting to a database, ready to be configured and loaded.
Uploading is the process of getting your raw data files onto the Experian Pandora server, ready to configure and process. This step shows how to import flat file data (from .txt files, CSVs, .dat files with associated metadata, or Excel sheets).
If your data is in a database (SQL Server, Oracle, postgreSQL, Amazon Redshift, MS Dynamics, or any other data source) the chances are that Experian Pandora can connect to it using a JDBC driver. Experian Pandora can also upload data from Hadoop HDFS, and from cloud-hosted data storage systems such as Amazon S3. For more information, refer to the user guide and Hadoop configuration guide.
Right-click Files in the Explorer and select Upload Files to open the file chooser. Select the file you want to upload and click Open.

Set file visibility permissions (who will be able to view the data in this file once it's uploaded) and click Upload.
You should see a pop up in the lower right corner to say when the job (in this case File Upload) was successful.
 2. Configure your data file
Configure the data file. Exclude or rename columns, choose standardisation options, decide how blanks or non-standard characters should be treated, and so on.
Here you specify how the file should be loaded as an Experian Pandora table, for example which field delimiter is used or whether the first row contains headers. Experian Pandora makes a guess by analysing the file, this you may want to over-ride the derived values. You may also want to rename or exclude columns, standardise values on load, set certain columns as keys or nullable, and so on.
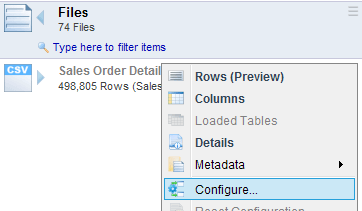
In the Explorer, right-click the name of the file you uploaded Explorer and select Configure.
Configure overall file settings. Click Preview at any stage to see how the data will look when loaded.
To configure settings for individual columns, click the Columns button.
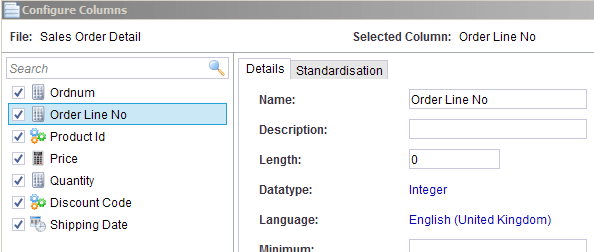
View and modify column metadata such as the derived data type, length, and name that Pandora has assigned each column.
Apply and then Preview to validate your changes.
Click either Apply or OK to confirm your configuration changes.
 3. Load data
Load the data file into the Experian Pandora repository. This will automatically profile it, discover relationships, and provide insight summaries.
The next task is to load the data into Experian Pandora, based on your configuration settings. Loading will create a new table version in the repository, and simultaneously profile the data and discover relationships.
In the Explorer, right-click the name of the file you uploaded Explorer and select Load.
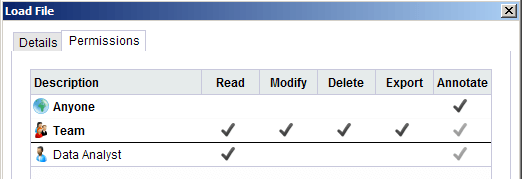
On the Load File dialogue, select the Permissions tab to set Read, Modify, Delete, Export or Annotate permissions at the global, team, and user level.
Click OK to start the load.
You should then see a pop up in the lower right corner to say when the job (in this case Table Load) was completed.
 4. Review profiling and analysis
Review the profiling and analysis information generated during the load. Discover new information about your data.
The process of loading data into Experian Pandora automatically causes it be profiled, with hundreds of pieces of metadata generated for each column. Here are three ways in which some of that profiling data can be used to quickly discover more about your data:
This report contains quality information for the whole table, such as column definition details (and where they differ from expected metadata definitions), and a per-column profile summary, including most frequent values and formats.
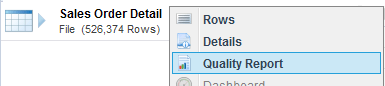
In the Explorer, browse to Data > Tables, right-click the loaded table, and select Quality Report.
Select Save As to optionally export the report as either an HTML page or PDF.
View the Column Profile drilldown for a more in-depth look at over 200 pieces of metadata derived from each column in the table. View uniqueness and completeness, common and rare values, zero and null counts, and many more.
In the Explorer, browse to Data > Tables. Locate your table, select it, and click on the word Columns.
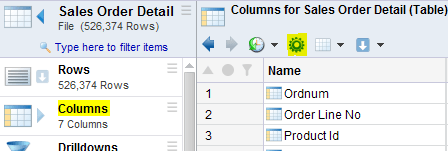
To expose more column profile information, click the cog (![]() ) icon to open the Drilldown Manager, and select hidden columns to show.
) icon to open the Drilldown Manager, and select hidden columns to show.
Because of the way the loaded data is stored, Experian Pandora makes it easy and quick to find out where a given value is used across all loaded tables.
In the Explorer, browse to Data > Tables, right-click the loaded table, and select Rows. This will display all values for the loaded table.

Right-click any value in the drilldown, and select Find Columns > Using this Value.
This will show a usage count for this value in all columns in all loaded tables where the value appears more than once. Right-click any one of the rows and select View Rows for the Searched Value to instantly display all rows where your chosen value occurs in the given column.
 5. Basic transforms and validations
Create an expression using Experian Pandora's extensive function library to transform the data in a column.
Now we have your data loaded into Experian Pandora we have the ability to manipulate it using expression, for example to using a function to prepare an alternative format for export as part of data migration, or adding a validation check.
A very simple transform would be to concatenate two columns and upper-case the resulting value, putting it into a new column.
In the Explorer, browse to Data > Tables, right-click the loaded table, and select Rows. This will display all values for the loaded table
Right-click a column header, and select Insert Column > Custom.
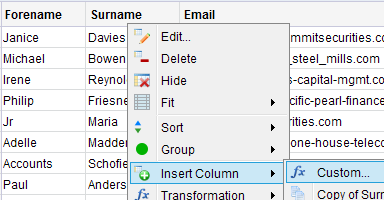
This will open up the Expression Editor, where you can create new expressions by chaining together functions.
Drag functions from the list into the edit panel, and select the columns you want to operate on.

Click Create to name the new column and add it to the drilldown. Save the resulting drilldown to save the transformation.
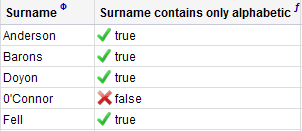
A very simple validation would be to check if the values in a column contain only alphabetic characters:
Follow the same process from 'Transformation Functions' to create a new column and open the Expression Editor.
Drag in the Check If function from the list, and select the columns you want to run the check on.
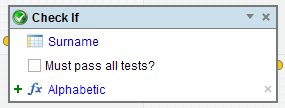
Click Create to name the new column and add it to the drilldown. The resulting new column will contain true and false values.
Save the resulting drilldown to save the transformation.
