By default, Duplicates stores are processed using the embedded Find duplicates server running within Data Studio. While suitable for testing and for small data sets, this is not recommended for production use. Processing large data sets through Find duplicates can use a significant proportion of system resources (CPU and memory) and impact other users and the performance of other workflows when run within Data Studio.
When you are ready to move to production or to process larger volumes, we recommended configuring Find duplicates to run as a separate instance.
A separate instance can be:
Before installing a separate instance of the Find duplicates server, make sure you meet the requirements below.
Hardware requirements differ depending on the number of records the Find duplicates step has to process, the quality of data, and its level of duplication.
| Number of records | Requirements |
|---|---|
| Up to 1 million | Small workload requirements |
| 1-10 million | Medium workload requirements |
| 10+ million | Large workload requirements |
To install a separate instance of the Find duplicates server as a Windows service follow these steps:
http://localhost:{port}/swagger-ui/index.html, where port is 8080 or a custom value configured above.The Find Duplicates service runs as a Java executable. For the best performance ensure that you have as much memory allocated to the JVM as possible.
The maximum heap size should be set as high as possible while allowing sufficient memory for the operating system and any other running processes.
To set the minimum and maximum values for the memory usage, use the JVM parameters Xms and Xmx in the Find Duplicates configuration file:
Find Duplicates.ini in a text editor.Virtual Machine Parameters=-Xms2g -Xmx8gFind Duplicates.ini and restart the Find Duplicates service.The Find duplicates service can be set up to support an encrypted connection (HTTPS).
Navigate to the Find Duplicates installation directory and open the find_duplicates.properties file.
Set the server.ssl.enabled property to true.
Uncomment the remaining lines (remove the initial # character) and populate with your keystore settings:
server.ssl.enabled=true
server.ssl.key-alias=your_key_alias
server.ssl.key-store=file:///path/to/my/certificate.pfx
server.ssl.key-store-type=PKCS12
server.ssl.key-store-password=yourKeyStorePassword
server.ssl.key-password=yourKeyPassword
See below for an explanation of each property.
server.ssl.key-alias: The alias for the server key and certificate in the keystore. If the keystore only contains one key this property can be omitted.
server.ssl.key-store: The pathname of the keystore file in URI format. If the keystore file is in the Find duplicates installation directory only the filename is required. To specify an absolute file path the file URI scheme format must be used: file://[hostname]/path. The hostname may be omitted if the path is local to the Find Duplicates server. Any spaces in the path must be replaced by their HTML equivalent, and on Windows backslash characters must be replaced by forward slashes. For example, a local keystore file path of C:\Find duplicates\certificate.pfx would be formatted as file:///C:/Find%20duplicates/certificate.pfx.
server.ssl.key-store-type: The keystore certificate format. If omitted this defaults to JKS.
server.ssl.key-store-password: The password to access the keystore file.
server.ssl.key-password: The keystore certificate password. Typically this is identical to the keystore password, in which case it can be omitted.
Open the Find Duplicates.ini file and find the line starting with Virtual Machine Parameters=. Find the server.port setting and updated it to your preferred port. The default SSL port is 8443.
Restart the Find Duplicates service.
Test the connection by browsing to https://localhost:{port}/swagger-ui/index.html using the port number configured above.
The JRE used by Data Studio will validate certificate trust. By default, the certificate must have a valid trust chain referencing a public Certificate Authority (CA). If a private CA is used to create the certificate, it must be added to the Java truststore being used by Data Studio. This can be by running the following command on the machine where Data Studio is installed:
C:\Program Files\Experian\Aperture Data Studio {version number}\java64\jre\bin\keytool.exe -import -trustcacerts -alias myCA -file "path\to\myCA.pem" -keystore "path\to\cacerts"
The cacerts can be found in the certificates folder of the Data Studio repository (by default, C:\ApertureDataStudio\certificates).
The default password for the cacerts truststore is changeit.
Logging is handled by the log4j framework. The logging behavior can be changed by updating the deployed log4j2.xml file, as described below.
The log level is specified for each major component of the deduplication process within its own section of the log4j2 configuration file under the XML section <loggers>. For example:
<Logger name="com.experian.match.rest.api" level="WARNING" additivity="false">
<AppenderRef ref="findDuplicatesLog"/>
</Logger>
<Logger name="com.experian.match.actorsys" level="WARNING" additivity="false">
<AppenderRef ref="findDuplicatesCoreLog"/>
</Logger>
This specifies that the logs will have a log level of WARNING, which is the recommended default for all components. Each component can have the logging level increased or decreased to change the granularity in the log file.
The components that may be individually configured are:
| Component | Description |
|---|---|
| com.experian.match.rest.api | The overall application's web controllers; the level set here is the default to be applied if none of the below are configured. |
| com.experian.match.actorsys | The core deduplication logic. |
| com.experian.standardisation | The API that interfaces to the standalone standardisation component. |
The log levels in the log4j2.xml file follow the hierarchy presented in the table below. Therefore, if you set the log level to DEBUG, you will get all the levels below DEBUG as well.
| Level | Description |
|---|---|
| ALL | All levels. |
| TRACE | Designates finer-grained informational events than DEBUG. |
| DEBUG | Granular information, use this level to debug a package. |
| INFO | Informational messages that highlight the progress of the application at coarse-grained level. |
| WARN | Potentially harmful situations. |
| ERROR | Error events that might still allow the application to continue running. |
| FATAL | Severe error events that will presumably lead the application to abort. |
| OFF | Suppress all logging. |
By default, the Find duplicates server is set to output the logs to {your Find Duplicates installation directory}\logs within two separate log files called findDuplicates.log and findDuplicatesCore.log.
To change this, edit the section of the log4j2.xml file shown below:
<RollingFile name="findDuplicatesLog"
             fileName="${LOG_DIR}/findDuplicates.log"
             filePattern="${ARCHIVE}/findDuplicates.log.%d{yyyy-MM-dd}.gz">
    <PatternLayout pattern="${PATTERN}"/>
    <Policies>
        <TimeBasedTriggeringPolicy/>
        <SizeBasedTriggeringPolicy size="1 MB"/>
    </Policies>
    <DefaultRolloverStrategy max="2000"/>
</RollingFile>
<RollingFile name="findDuplicatesCoreLog"
             fileName="${LOG_DIR}/findDuplicatesCore.log"
             filePattern="${ARCHIVE}/findDuplicatesCore.log.%d{yyyy-MM-dd}-%i.gz">
    <PatternLayout pattern="${PATTERN}"/>
    <Policies>
        <TimeBasedTriggeringPolicy/>
        <SizeBasedTriggeringPolicy size="1000 MB"/>
    </Policies>
    <DefaultRolloverStrategy max="100"/>
</RollingFile>
Adjusting the fileName attribute allows you to change the name and location; for example, you may choose to output logging from all components into a single file, or different file names than the ones above.
The Find Duplicates Service runs using Spring Boot with an embedded Tomcat server. CORS settings for the embedded Tomcat server are passed via JVM parameters. For example, to allows connections to any resource from any domain, find the line starting with Virtual Machine Parameters= in the Find Duplicates.ini file in the Find Duplicates install directory and append the following value:
-Dcors.allowed.origins=*
Additonal Tomcat CORS settings can be configured in the same way as shown above using the corresponding JVM parameter for each:
cors.allowed.origins
cors.allowed.methods
cors.allowed.headers
cors.exposed.headers
cors.preflight.maxage
cors.support.credentials
For more details on CORS configuration refer to the Tomcat CORS Filter documentation.
http://{hostname}:{port}/api/version.Once you've installed a separate instance of the Find duplicates server, you can configure Data Studio to use it by default:
Go to Configuration > Step settings > Find duplicates.
Toggle on Remote server: Enabled.
Specify the following to connect to your Find duplicates server:
| Item | Description |
|---|---|
| Remote server: Hostname | The IP address or the machine name. Do not include the protocol (http://). |
| Remote server: Path | The base path of the Data Studio REST API. This should be left blank when using the Find Duplicates Windows service. |
| Remote server: Port | The port number used by the service. Default: 8080 |
If you configured the Find duplicates server to use HTTPs, you have to toggle on Remote server: Use https (TLS/SSL) to encrypt the connection.
Click Test connection to confirm that the server information has been entered correctly and that Data Studio can connect to the Find Duplicates server. If you receive a licensing error, the connection has been successful, but the server still needs to be licensed.
To license the Find Duplicates server from Data Studio, go to About Aperture Data Studio and confirm that Find Duplicates is listed as a licensed component. Click Refresh license information, close the About Aperture Data Studio page, then click Test connection again. The Find Duplicates step should now show as Licensed.
Once you've installed a separate instance of the Find duplicates server, you may need to apply the license using the Find Duplicates REST API Swagger page. This may be needed if the Find duplicates server is not set as the default remote server in Data Studio workflow step settings and needs to be licensed separately.
Open the Find Duplicates Swagger endpoint:
http(s)://{hostname}:{port}/match/docs/index.html
Check whether Find Duplicates is already licensed:
"isLicensed": false, apply a license.Apply the license:
Confirm the license has been applied by running the GET /match/system request again. The response should now show "isLicensed": true.
Follow the steps below to deploy Find duplicates manually to a separate web server:
Before installing a separate instance of the Find duplicates server, make sure you meet the requirements below.
war file. We recommend Apache Tomcat.The Find duplicates step uses an external service named GdqStandardizeServer to perform input standardization. This service has to be running for the Find duplicates step to work correctly.
Prior to installing or starting the service, you need to copy the Standardize directory:
Standardize directory e.g. C:\Program Files\Experian\Aperture Data Studio {version number}\Standardize.Standardize directory to a location of your choice on your remote machine. We recommend:C:\Program Files\Experian\Standardize if you are using Windows./home/<user>/experian/Standardize if you are using Linux.Once you have copied the Standardize directory, you need to install Experian.Gdq.Standardize.Web as a service. Follow the instructions below.
There are two methods for installing Standardize, the first is using PowerShell and the second is using the windows command prompt. If PowerShell is disabled in your environment, use the command prompt option.
Standardize directory..\GdqStandardizeServiceManager.ps1 install. This will register the service in the Windows Services console..\GdqStandardizeServiceManager.ps1 start. This will attempt to start the service.SC create GdqStandardizeServer binpath= "{path to Standardize directory}\Experian.Gdq.Standardize.Web.exe action:run" start= "auto". This will register the service in the Windows Services console.SC start GdqStandardizeServer. This will attempt to start the service.Standardize directory../install_linux_prereqs.sh. This will install further prerequisites required for the service../deploy_gdqs.sh. This will install and start the service.Install the latest stable version of your chosen application server. We recommend using Apache Tomcat.
You will need to install a 64-bit Java JDK or JRE before you can run Apache Tomcat. Tomcat 9.0 requires Java 8 or higher. Refer to the Apache Tomcat documentation for more information on Java version support.
If you're using Linux, ensure you have full access to:
/conf, /webapps, /work, /temp, /db and /logs.The Find duplicates server is deployed like any other web application by copying the supplied war file to the Apache Tomcat \webapps directory.
To check that your deployment was successful, go to: http://localhost:{port}/match-rest-api-{VersionNumber}/match/docs/index.html. The default Tomcat port is 8080.
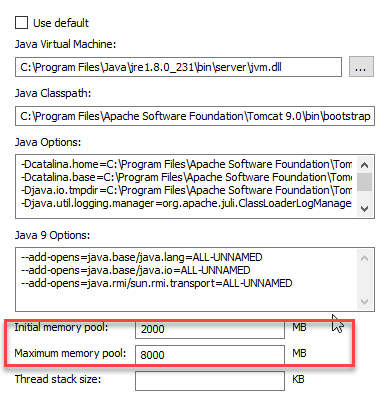
Ensure that you have as much memory allocated to the Tomcat JVM as possible.
The maximum heap size should be set as high as possible while allowing sufficient memory for the operating system and any other running processes.
To set the minimum and maximum values for the memory usage:
When deploying a remote instance of the Find duplicates server, it can be set up to support an encrypted connection (HTTPS). Follow the steps within your application web server documentation to achieve this.
If using Apache Tomcat, refer to the SSL/TLS configuration how-to guide for detailed steps and supported protocols.
If you already have a PKCS12 (.pkcs12 .pfx or .p12) file containing the certificate chain and private key, this is the easiest way to configure SSL for Find duplicates using Tomcat. The PKCS12 file can be used directly as a keystore for Tomcat.
Locate Tomcat's main configuration file, /conf/server.xml, in the installation root directory. If this is the first time you are configuring TLS for Tomcat, first you will need to uncomment the SSL Connector element by removing the comment tags <!–- and -–>. To edit the Connector that connects on port 8443 by default using JSSE:
<Connector port="8443" protocol="org.apache.coyote.http11.Http11NioProtocol"
    SSLEnabled="true"
    scheme="https"
    secure="true"
    keystoreFile="C:/path/to/my/certificate.pfx"
    keystoreType="PKCS12"
    keystorePass="your keystore password"
    clientAuth="false"
    SSLProtocol="TLSv1.2"
/>
Test the connection by browsing to https://localhost:{port}/match-rest-api-{VersionNumber}/match/docs/index.html. The default Tomcat port is 8443.
The JRE used by Data Studio will validate certificate trust. By default, the certificate must have a valid trust chain referencing a public Certificate Authority (CA). If a private CA is used to create the certificate, it must be added to the Java truststore being used by Data Studio. This can be by running the following command on the machine where Data Studio is installed:
C:\Program Files\Experian\Aperture Data Studio {version number}\java64\jre\bin\keytool.exe -import -trustcacerts -alias myCA -file "path\to\myCA.pem" -keystore "path\to\cacerts"
The cacerts can be found in the certificates folder of the Data Studio repository (by default, C:\ApertureDataStudio\certificates).
The default password for the cacerts truststore is changeit.
The instructions in this section only apply if you wish to configure logging information in greater detail.
When the Find duplicates server has been deployed using Tomcat, the findDuplicates.log and findDuplicatesCore.log files can be found in CATALINA_HOME\logs. Logging is handled by the log4j framework. The logging behavior can be changed by updating the deployed log4j2.xml file, as described below.
On Linux, the log file path(s) must be specified explicitly in the log4j2.xml configuration file as shown below:
<Property name="LOG_DIR">${sys:catalina.home}/logs</Property>
<Property name="ARCHIVE">${sys:catalina.home}/logs/archive</Property>
The log level is specified for each major component of the deduplication process within its own section of the log4j2 configuration file under the XML section <loggers>. For example:
<Logger name="com.experian.match.rest.api" level="WARNING" additivity="false">
<AppenderRef ref="findDuplicatesLog"/>
</Logger>
<Logger name="com.experian.match.actorsys" level="WARNING" additivity="false">
<AppenderRef ref="findDuplicatesCoreLog"/>
</Logger>
This specifies that the logs will have a log level of WARNING, which is the recommended default for all components. Each component can have the logging level increased or decreased to change the granularity in the log file.
The components that may be individually configured are:
| Component | Description |
|---|---|
| com.experian.match.rest.api | The overall application's web controllers; the level set here is the default to be applied if none of the below are configured. |
| com.experian.match.actorsys | The core deduplication logic. |
| com.experian.standardisation | The API that interfaces to the standalone standardisation component. |
The log levels in the log4j2.xml file follow the hierarchy presented in the table below. Therefore, if you set the log level to DEBUG, you will get all the levels below DEBUG as well.
| Level | Description |
|---|---|
| ALL | All levels. |
| TRACE | Designates finer-grained informational events than DEBUG. |
| DEBUG | Granular information, use this level to debug a package. |
| INFO | Informational messages that highlight the progress of the application at coarse-grained level. |
| WARN | Potentially harmful situations. |
| ERROR | Error events that might still allow the application to continue running. |
| FATAL | Severe error events that will presumably lead the application to abort. |
| OFF | Suppress all logging. |
By default, the Find duplicates server is set to output the logs to CATALINA_HOME\logs within two separate log files called findDuplicates.log and findDuplicatesCore.log.
To change this, edit the section of the log4j2.xml file shown below:
<RollingFile name="findDuplicatesLog"
             fileName="${LOG_DIR}/findDuplicates.log"
             filePattern="${ARCHIVE}/findDuplicates.log.%d{yyyy-MM-dd}.gz">
    <PatternLayout pattern="${PATTERN}"/>
    <Policies>
        <TimeBasedTriggeringPolicy/>
        <SizeBasedTriggeringPolicy size="1 MB"/>
    </Policies>
    <DefaultRolloverStrategy max="2000"/>
</RollingFile>
<RollingFile name="findDuplicatesCoreLog"
             fileName="${LOG_DIR}/findDuplicatesCore.log"
             filePattern="${ARCHIVE}/findDuplicatesCore.log.%d{yyyy-MM-dd}-%i.gz">
    <PatternLayout pattern="${PATTERN}"/>
    <Policies>
        <TimeBasedTriggeringPolicy/>
        <SizeBasedTriggeringPolicy size="1000 MB"/>
    </Policies>
    <DefaultRolloverStrategy max="100"/>
</RollingFile>
Adjusting the fileName attribute allows you to change the name and location; for example, you may choose to output logging from all components into a single file, or different file names than the ones above.
Once you've installed a separate instance of the Find duplicates server, you can configure Data Studio to use it by default:
Go to Configuration > Step settings > Find duplicates.
Toggle on Remote server: Enabled.
Specify the following to connect to your Find duplicates server:
| Item | Description |
|---|---|
| Remote server: Hostname | The IP address or the machine name. Do not include the protocol (http://). |
| Remote server: Path | The location of the folder that was created when the war file was read. Default: match-rest-api-{VersionNumber} |
| Remote server: Port | The port number used by the service. Default: 8080 |
If you configured the Find duplicates server to use HTTPs, you have to toggle on Remote server: Use https (TLS/SSL) to encrypt the connection.
Click Test connection to confirm that the server information has been entered correctly and that Data Studio can connect to the Find Duplicates server. If you receive a licensing error, the connection has been successful, but the server still needs to be licensed.
To license the Find Duplicates server from Data Studio, go to About Aperture Data Studio and confirm that Find Duplicates is listed as a licensed component. Click Refresh license information, close the About Aperture Data Studio page, then click Test connection again. The Find Duplicates step should now show as Licensed.
