For each model-driven app form where validation is required the EDQ Form Manager library must be loaded and the EDQ field controls must be configured on the required address, email and phone form fields.
The edq_formmanager web resource will need to be added to the form by following these steps:
Select Tables from the left hand menu of the main Power Apps interface.
Click the Table you want to configure.
Click Forms from the Data experiences panel at the top of table page.
Click the Form you want to configure (e.g. Account).
Click Form libraries in the command bar.
Click the + Add library button in the Form libraries panel that appears on the left.
Search for and add the EDQ form manager (edq_formmanager) library by selecting it and clicking the Add button.

Select the Events tab in the panel on the right, expand On Load and click the + Event Handler button.
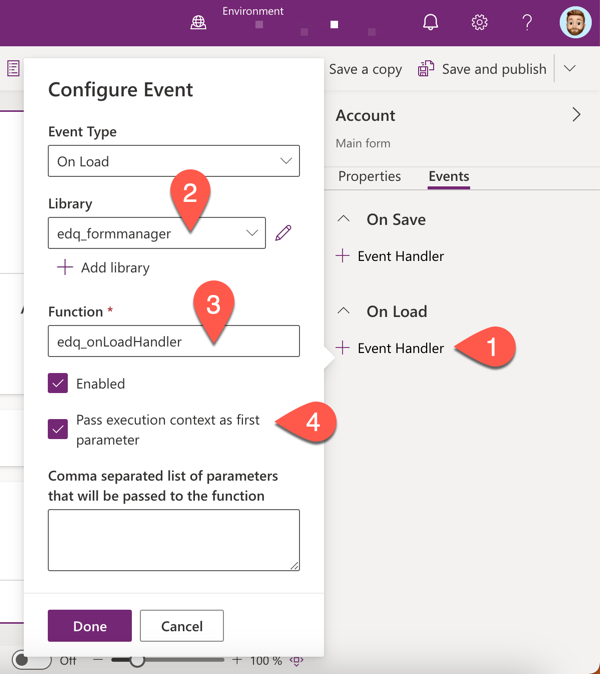
For Library select the previously added edq_formmanager and in the textbox labelled Function type in edq_onLoadHandler. Be sure that both checkboxes labelled Enabled and Pass execution context as first parameter are selected.
Click Done to close the Configure Event panel.
Configuring the field controls
On each form, the address, email and phone fields should be configured with the appropriate EDQ control to enable validation. With the form window still open follow these steps:
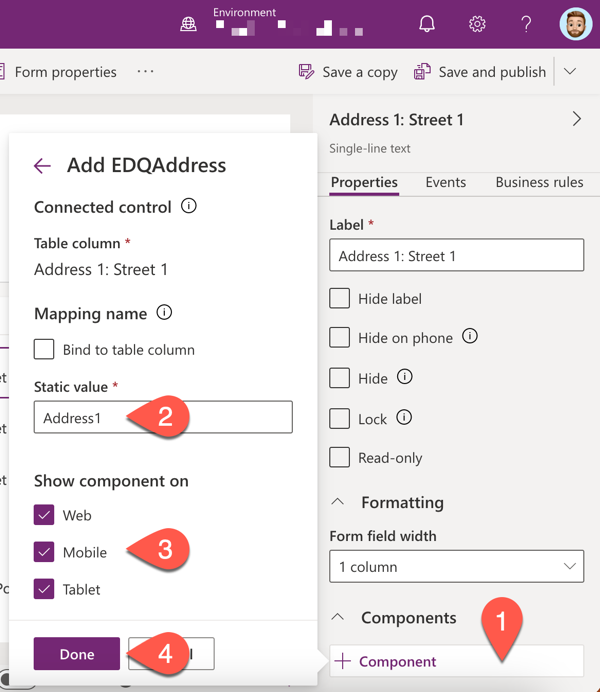
- Select the first address field you would like to be validated, typically Address 1: Street 1 by default. If you are configuring a composite address field, an additional custom text field must be added to the form to act as the search trigger and the EDQ control configured on this field instead.
- Select the Properties tab in the panel on the right, scroll down to Components and click the + Component button.
- Search for and select EDQAddress.
- Enter the mapping name in the Static value text box. This would be Address1 or Address2 if you're following the quick setup instructions and using the mappings that come pre-configured with the solution.
- Select where you want the control to be shown - Web, Mobile and/or Tablet.
- Click Done to close the component configuration panel.
- Repeat these steps for other address fields as required.
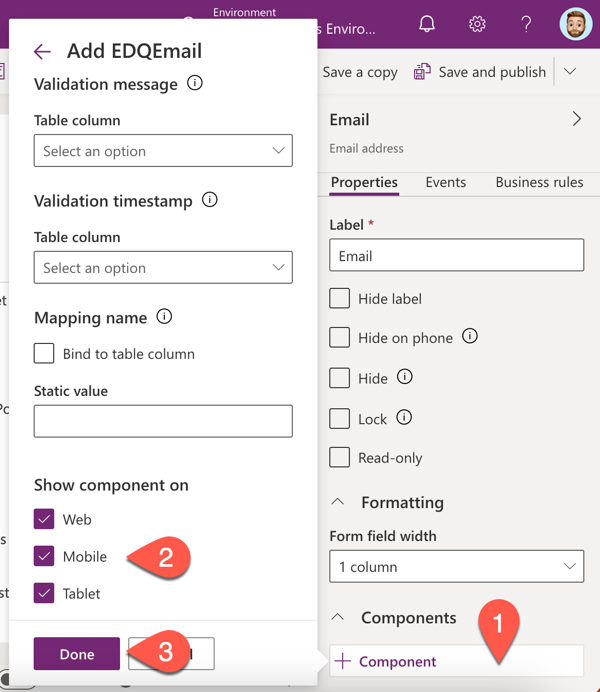
- Select the email field you would like to be validated.
- Select the Properties tab in the panel on the right, scroll down to Components and click the + Component button.
- Search for and select EDQEmail.
- Configuration of the Validation message, Validation timestamp and Mapping name are all optional. Their configuration is detailed later when setting up an email mapping.
- Select where you want the control to be shown - Web, Mobile and/or Tablet.
- Click Done to close the component configuration panel.
- Repeat these steps for other email fields as required.
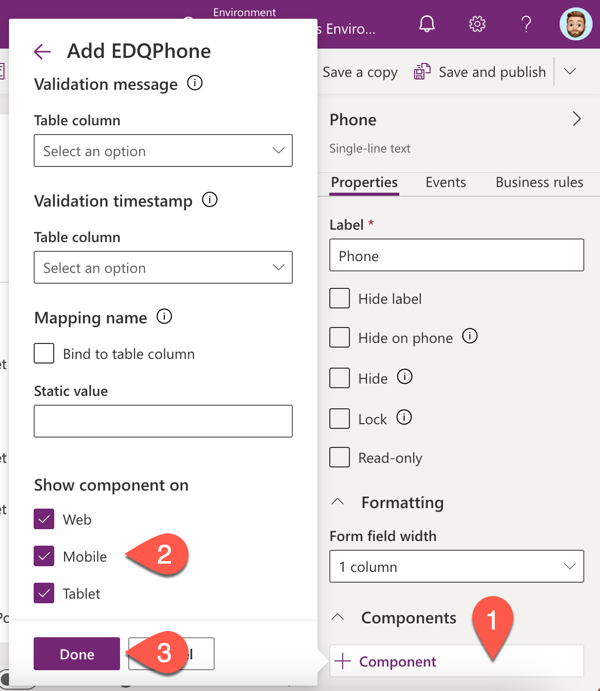
- Select the phone field you would like to be validated.
- Select the Properties tab in the panel on the right, scroll down to Components and click the + Component button.
- Search for and select EDQPhone.
- Configuration of the Country code field, Validation message, Validation timestamp and Mapping name are all optional. Their configuration is detailed later when setting up a phone mapping.
- Select where you want the control to be shown - Web, Mobile and/or Tablet.
- Click Done to close the component configuration panel.
- Repeat these steps for other phone fields as required.
- Click Save and publish in the command bar to commit your form changes.
- Navigate back and then repeat the steps on this page for other forms as required.
Quick setup complete
You have now completed the quick setup steps to enable basic address, email and/or phone validation on your forms. If you want to take things further the next sections detail the additional data you can configure, creating new fields to store validation status and timestamp as well as the additional data, mapping the data to fields on your forms, plus other advanced configuration options.
